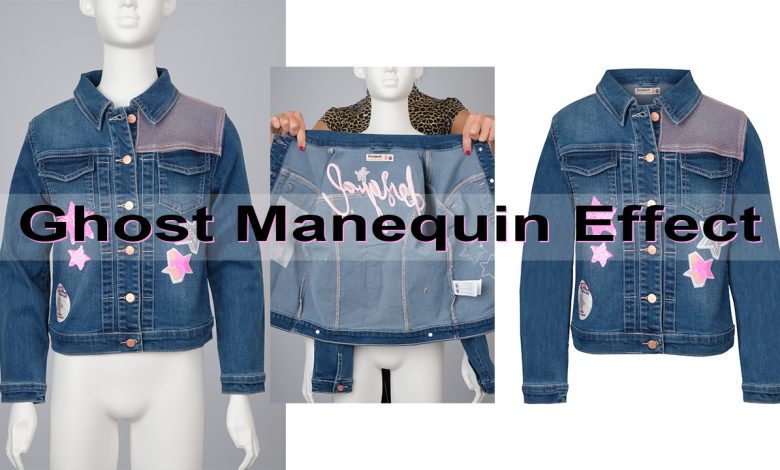
Photoshop Ghost Mannequin Effect is one service that is a combination of multiple ones. The origin of the editing comes with the necessity of apparel presentation without a human model. Well, this is not a replacement for human beings and performed by mannequins along with photo editing. In fact, this is a similar altering protocol that is convenient and different by the presentation.
The operation is quite well-known today but the best performance anyone can get from Clipping World. All the steps are so precise here according to the garments or apparel. The removal of the mannequin is a matter of art and expertise. And, only professionals are capable of doing such editing that gives the best output.
A Brief On Ghost Mannequin Service
Removing the mannequin from the apparel photograph and adding the back part is the goal of the Ghost Mannequin Effect. Apparel in the photo selection, isolation, joining back parts, shadow addition, and finalizing are the objectives. With the combination of the operations, the Ghost Mannequin Service gives a complete result.
The final image of the apparel will look hollow with a 3D appearance. The availability of human models is less and the cost is too high. On the other hand, the mannequin is a one-time investment and the charge for the service is also cheap. So, the editing category saves enough money and is always available. New business owners use this service to spend less in the beginning.
Steps Of The Operation
A few but specific steps are necessary for a successful ghost mannequin operation that we mentioned above. Here we will go with a little explanation that can guide you to do it yourself. As this is a written tutorial, we will let you know the process and some instructions to follow. Do not worry, it is quite easy and effective if you go through the whole operation step by step.
Step 1: The Isolation
The first thing you need to do for ghost mannequin editing is isolating the apparel from the whole image. You have to do the same for the back part as well. We use the Pen Tool from Photoshop for perfect path creation and making a selection. If you are not familiar with path creation, look for some tutorials on the web. Use Ctrl/Command+Enter/Return for Win/MAC to make a selection according to the path. Now, use Ctrl/Command+J for Win/MAC to create a copy of the selected part to a new layer.
Step 2: Fixing Alignment
As you have isolated the parts from the whole photograph, you need to fix the alignment. Use guidelines from Photoshop software and use Ctrl/Command+T for Win/MAC to use the transform tool. Rotate as you need from any corner to complete the task. You can also do this step before the isolation as well.
Step 3: Combining Parts
Add the back part behind the front part to give the apparel image a complete look. Shift layers to place the parts in order. Here you need to do an additional modification with the warp. Select one layer at a time and make some changes to match both parts. You may need some assistance so that you can have a complete guideline from the above-linked blog.
Step 4: Ironing
Apparel photographs may come out with some wrinkles or creases. Use Photoshop Patch Tool to select and replicate plain areas of the same apparel. The operation may be a little difficult if the surface contains textures. Find matching areas for this and do the ironing as much as required.
Step 5: Shadow Addition
Select the layer with the front part of the apparel and double click to open the Layer Style window. Select the drop shadow and make the spread a little more to soften the edge. Separate the shadow by right-clicking on the layer and choose ‘Select Layer’. Now cut additional areas according to the path so that no spread is visible. Just the shadow behind the front part and over the back part.
Step 6: Finalizing
As you have completed the above steps you are at the end of the job. So, check the view properly to find and fix any mistakes. You can go back to any step to do this. When you find this alright, save the project in PSD or TIFF format so that you can have the layers later.
Usefulness
The usefulness of the Ghost Mannequin Service is huge in eCommerce. The editing not only saves money for apparel presentation but also makes a smart visual. You can see the difference after completing the whole operation. The apparel will get a three-dimensional view with a ghostly hollow look.
Conclusion
To conclude, the Ghost Mannequin Effect is a timeless creation for apparel presentation. The service is an option to save time and cost, but human models’ presence is the best. Professional photo editors can serve the ghost effect with the best look. You can do it also if you follow the instructions and correct the mistakes. Do your best to succeed.


